• Home
  • Meet Kelly
  • My House
  • Contact

Kelly Elko

Love where you live - inspired decorating ideas

  • Eclectic Homes
  • Projects
    • My Projects
    • FREE Printables
    • Garden
    • Recipes
    • Tips & Tricks
    • Organization
  • Decorate
    • My House
    • Decorating
    • Outdoors
    • Christmas
    • Fall
    • Summer
    • Spring
    • Tablescapes
  • Life
    • Travel
    • Musings
  • Shop

DIY Painted Paisley Plate Wall
March 25, 2013  My Projects | Uncategorized


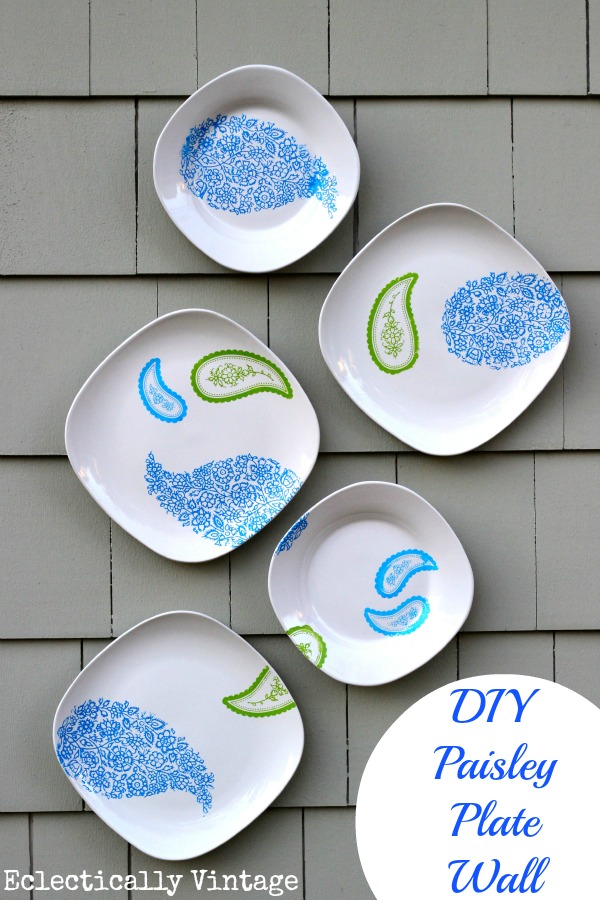
DIY Plate Wall - just one of the many ways you can customize your own plate wall!  kellyelko.com

You know I love a good plate wall.

From my eclectic dining room plate wall to the tons of inspiring ideas I’ve pinned to my Plate Wall Pinterest board, it’s obvious.
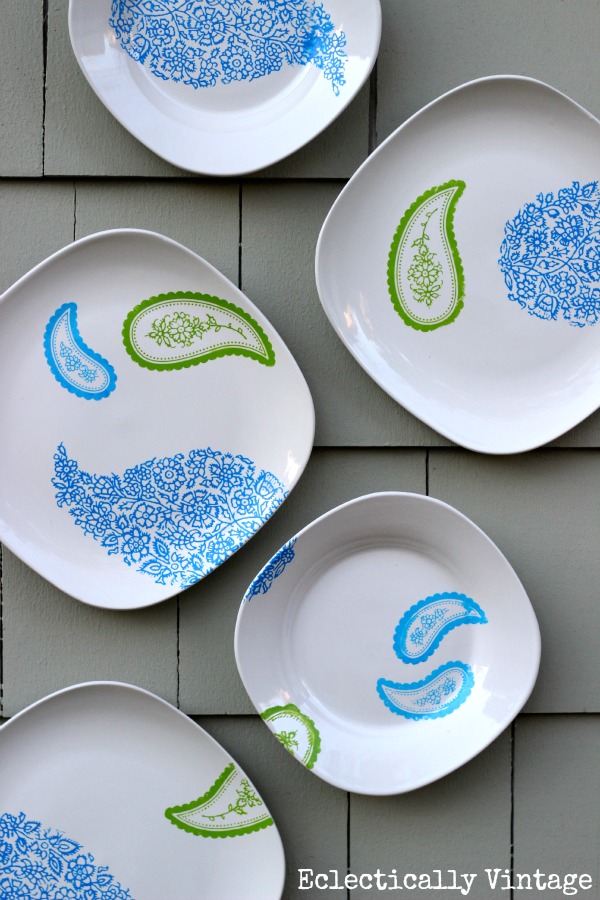
DIY Paisley Plate Wall - just one of the many ways you can customize your own plate wall!  kellyelko.com

So what’s better than being able to create your own DIY plate wall in any pattern and color you desire?
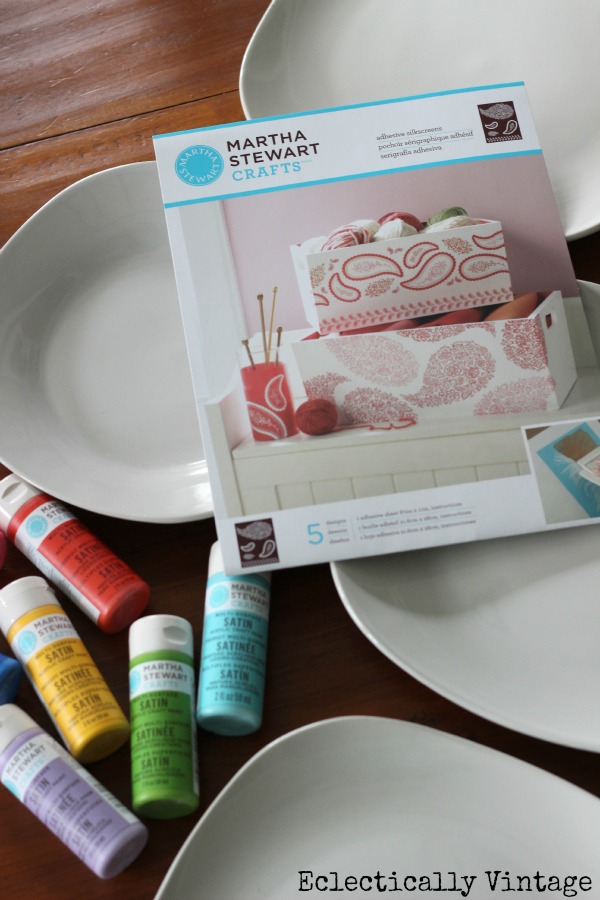
DIY Paisley Plate Wall - just one of the many ways you can customize your own plate wall!  kellyelko.com

DIY Paisley Plate Wall

1) Buy cheap plates from the dollar store

2) Play around until you find the perfect arrangement

3) Stick self adhesive stencil to the plate (I used Martha Stewart Crafts paisley stencils)

4) Use a pouncer to apply paint and remove stencil immediately

5) Hang your masterpiece and stand back to admire it

Note:  Use whatever colors you love – I used 3 Martha Stewart Crafts paints:  Spring Pasture, Indigo and Pool (contains some affiliate links)
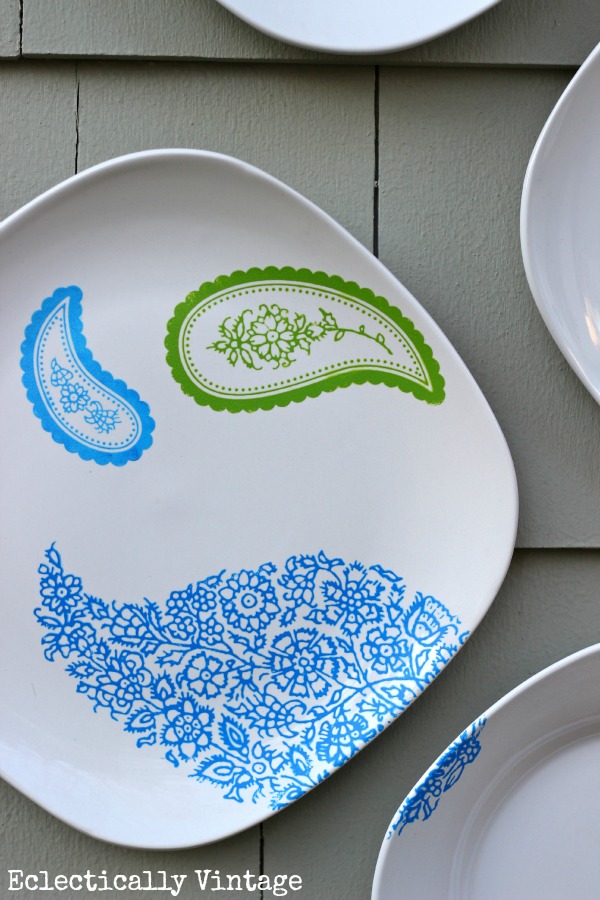
DIY Paisley Plate Wall - just one of the many ways you can customize your own plate wall!  kellyelko.com

I love these invisible plate hangers and use them but since I didn’t have any on hand, I whipped up my own version with just 3 simple things.
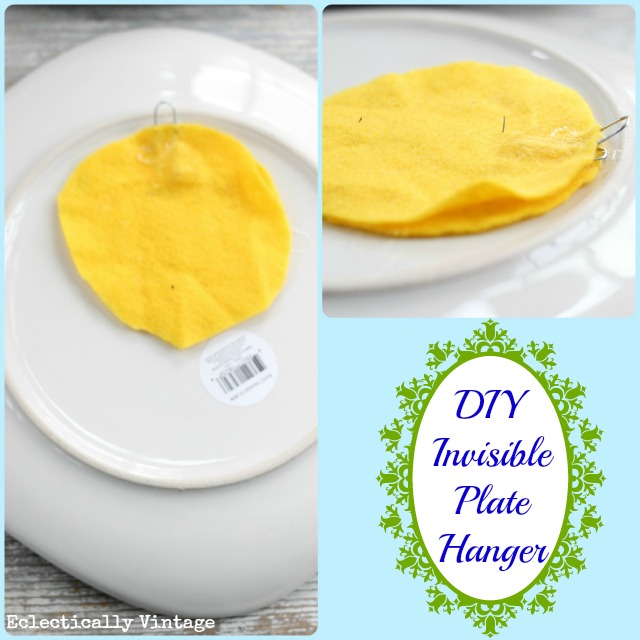
DIY Invisible Plate Hangers - save tons of money by making these!

DIY Invisible Plate Hangers

1) Cut two circles of felt for each plate

2) Stick first felt circle to back of plate with a super glue (I used E-6000)

3) Place large paper clip so that the loop is above the lip of the back of the plate (see picture) and glue on with E-6000

4) Put more glue on the entire surface of the piece of felt and attach second piece of felt on top (sandwiching the paper clip between the two pieces of felt)

5) Let dry overnight and hang with a picture hanger

Note:  Don’t do this on valuable plates or hang over beds!  

DIY Paisley Plate Wall - just one of the many ways you can customize your own plate wall!  kellyelko.com


My 12 Months of Martha Projects
January – Valentine Table
February – Peter Cottontail Silhouette

Thrilled to be part of 12 Months of Martha – where I create something fabulous every month.
Sign up to get Kelly Elko's latest posts delivered right to your inbox
Your information will never be shared or sold to a 3rd party.

Share this Post!

16 shares
  • Facebook
  • Twitter
  • Email
« Previous: I Scored at the Thrift Store – Glass Fishing Buoys
Next: Make a Peeps Wreath that Lasts for Years! »

Leave a Comment Cancel reply

Your email address will not be published. Required fields are marked *

Comments

  1. Trinity B.

    March 25, 2013 at 5:17 am

    I am in love with these! The design and colors are exactly something I would have picked, and I love how you had them sort of carry over from one plate to the next. Aren’t you clever?! Thanks for sharing. 🙂

    Reply
  2. Lauren @ The Endearing Home

    March 25, 2013 at 7:00 am

    What an awesome idea! I think I need to make a trip to Michael’s and Dollar Tree today, looks like a really fun project to make with my kids : )

    Reply
  3. Heidi @ Decor & More

    March 25, 2013 at 7:11 am

    Love the bright colors and your hanging technique is inspired. 🙂 Happy Monday, Kelly!
    xo Heidi

    Reply
  4. Bliss

    March 25, 2013 at 8:48 am

    I may not love up chevron but I do love me some paisley. Including Brad.

    Bliss

    Reply
  5. Jen O'Brien

    March 25, 2013 at 9:01 am

    So cool & clever! love those Kelly!

    Reply
  6. Jill Flory

    March 25, 2013 at 9:28 am

    Cute cute Kelly! I love how you painted them!

    Reply
  7. Shari @ Turnstyle Vogue

    March 25, 2013 at 9:40 am

    Those are great. You can’t even tell the patterns are stenciled on. You’ve got skillzzzz. !

    Reply
  8. Thistle

    March 25, 2013 at 9:53 am

    I LOVE this project! Totally pinning! The colors are perfect for spring! You go girl!

    Have a great day rock star!
    karianne

    Reply
  9. Melissa @ DaisyMaeBelle

    March 25, 2013 at 9:56 am

    LOVE this project! I am obsessed with plate walls these days! I am collecting all kinds of plates. . . in hopes that one of my next clients will have a wall that would be perfect for plates! Life to the full, Melissa

    Reply
  10. Crystelle Boutique

    March 25, 2013 at 10:54 am

    These are very pretty plates what a terrific idea…. And beautifully arranged as well….!
    Terrific project!

    hugs x
    Crystelle
    Crystelle Boutique

    Reply
  11. [email protected]

    March 25, 2013 at 11:00 am

    I love these Kelly! Those stick on stencils look like they leave a nice clean edge. Beautiful!

    Reply
  12. Christine

    March 25, 2013 at 11:20 am

    Way to go Kelly!!! The plates turned out AMAZING!!!!!

    I need to get cracking on my project too! hehe

    Reply
  13. Linda @ Itsy Bits And Pieces

    March 25, 2013 at 11:26 am

    Kelly, this is really awesome…I never realized you could do this with plates! I love the self hanger tutorial, too! Thanks for sharing!

    Reply
  14. katie

    March 25, 2013 at 12:16 pm

    super cute plate wall! I love that paisley pattern!

    Reply
  15. vel

    March 25, 2013 at 12:45 pm

    they are gorgeous Kelly! looks store-bought even! Just a quick question, these are just for diplay right? Not for any serving or anything right? Just wondering if you can use it to serve if you bake it and let the paint set? Dont have these kinds of paint yet so not sure if thes can be used for these kinds of plates. Anyway, if you can’t eat on them, they are pretty to look at anyway! 🙂

    Reply
    • Kelly @ Eclectically Vintage

      March 25, 2013 at 12:53 pm

      Martha suggest these should be for display – not eating Vel!

      Reply
  16. Debbie

    March 25, 2013 at 12:46 pm

    Love the look! And I really love that stencil!! I’ll be looking for it next time I’m at Michael’s. Beautiful.
    Debbie 🙂

    Reply
  17. Jen | Something Turquoise

    March 25, 2013 at 1:12 pm

    Kelly! These are great!!! Love the colors 🙂

    Reply
  18. [email protected]

    March 25, 2013 at 2:15 pm

    Very cute!

    Reply
  19. Lizz

    March 25, 2013 at 7:42 pm

    Thanks for the hanger ideal!

    Reply
  20. Christina @ No. 29 Design

    March 25, 2013 at 7:55 pm

    I’m a huge plate decorating fan too. I love the way they flow together. Is that an exterior wall? That would look great on my sunporch.

    Reply
  21. Kelly @ thelilypadcottage

    March 25, 2013 at 8:17 pm

    This looks amazing! I never would have guessed you painted these, genius as always. And I totally love your Mcgyver moves on the plate hangers 🙂

    Reply
  22. Keeping It Cozy

    March 25, 2013 at 8:38 pm

    So pretty! Love the stencil and your plate hangers are pretty neat… can’t tell you how many times that would have come in handy. 😉

    Reply
  23. Nana Diana

    March 25, 2013 at 9:16 pm

    Kelly-Those are absolutely darling. I love the way they turned out..and those plate hangers are GREAT! xo Diana

    Reply
  24. Jane @ Cottage at the Crossroads

    March 25, 2013 at 9:53 pm

    My visible plate hangers seem SO out of date. Thanks for showing how to make them invisible. Love the paisley stencil and the way you varied each plate. Just fabulous!

    Reply
  25. Little Bit

    March 26, 2013 at 11:18 am

    These are super cute! I’m pinning/repinning!! LIttle Bit

    Reply
  26. Becca

    March 26, 2013 at 8:02 pm

    You put Martha to SHAME! I am in love with these and will definitely be trying this! Thanks for sharing. 🙂

    Reply
  27. KC @ Real Coake

    March 26, 2013 at 8:29 pm

    How gorgeous! I love the colors and the paisley…beautiful.
    KC

    Reply
  28. Niki

    March 26, 2013 at 9:36 pm

    Each plate is beautiful, and so is the display. I just love paisleys.

    Reply
  29. Heather @At The Picket Fence

    March 26, 2013 at 9:48 pm

    Love this Kelly so pretty! The colors are some of my favorites and I love that stencil!

    Heather

    Reply
  30. Jaderbomb

    March 29, 2013 at 9:04 am

    Kelly! I love these plates!!!
    -jade

    Reply
  31. sherry

    March 29, 2013 at 11:30 pm

    These are so sweet! I’ve always liked paisley and your color choices are very fresh and fun for spring. It looks like these are hanging in an outdoor space too….I like that idea. We have a wall of wooden fence that our deck butts up to and I would love to add some interest there.

    Reply
  32. Cynthia @ A Button Tufted Life...

    March 30, 2013 at 8:06 am

    I love how you led one plate into the next by breaking the stencil pattern over the two plates… clever gal!

    Reply
  33. GS test demo

    April 1, 2013 at 2:42 am

    DIY Painted Paisley Plate Wall

    Reply
  34. Julie

    April 1, 2013 at 11:48 am

    Good tip about not hanging over the bed. Love these, wish I had an empty wall!

    Reply
  35. MariaElena

    April 2, 2013 at 7:22 am

    Love, love this project! What a gorgeous idea. Stencils is one of my weakness. 🙂 I have a new weekly link party which is live now and I would love if you stop by and link up this wonderful post! Hope to see you there! http://mariaelenasdecor.blogspot.com/
    Hugs
    Maria

    Reply
  36. [email protected] Stroll Thru Life

    April 2, 2013 at 9:55 am

    How fun and creative is this. I love it. Thanks tons for joining TTT. Hugs, Marty

    Reply
  37. Pat

    April 2, 2013 at 1:38 pm

    Love it! I’ve looked and looked at Martha’s stencils at Michael’s…just couldn’t decide what to do. This is such a great idea!

    Reply
  38. Pat

    April 2, 2013 at 1:38 pm

    Love it! I’ve looked and looked at Martha’s stencils at Michael’s…just couldn’t decide what to do. This is such a great idea!

    Reply
  39. Darla

    April 7, 2013 at 6:33 pm

    Those are to die for. Now my brain is churning, thinking of all the rooms I could hang plates in & get away with it wthout looking like I just inherited a china shop!
    One question, before your hanging tutorial, you said “these” were your favorite late hangers, but since you didn’t have any on hand, you were making your own. Was there supposed to be a picture o a link to the “these” you referred to?

    Thanks, Darla

    Reply
  40. Danielle

    May 31, 2013 at 6:16 pm

    What a great idea to paint some white plates! Can you eat off these or are they just for decoration on the wall?

    I’m hosting a “Craft With What You’ve Got” party and the featured crafting supply this week is craft paints. This project would fit in perfectly! I’d love for you to link it up here.

    Danielle at Framed Frosting

    Reply
    • Kelly @ Eclectically Vintage

      May 31, 2013 at 9:43 pm

      They are decorative only Danielle.

      Reply
  41. jen

    May 12, 2015 at 1:37 pm

    I’d feel safer sewing the paper clip on the first piece of felt

    Reply
    • Kelly @ Eclectically Vintage

      May 12, 2015 at 3:11 pm

      You could definitely do that Jen but I found that super glue works like a charm!

      Reply

Trackbacks

  1. DIY 3-D Artwork & a Giveaway - Eclectically Vintage says:
    April 26, 2013 at 8:04 am

    […] My 12 Months of Martha Projects January – Valentine Table February – Peter Cottontail Silhouette March – Paisley Plate Wall […]

    Reply
  2. Painted Key to My Heart Necklace - Eclectically Vintage says:
    June 5, 2013 at 10:38 pm

    […] of Martha Projects January – Valentine Table February – Peter Cottontail Silhouette March – DIY Paisley Plate Wall April – 3-D Butterfly […]

    Reply
  3. How to Etch Glass - DIY Etched Cake Cover says:
    August 4, 2013 at 7:26 pm

    […] of Martha Projects January – Valentine Table February – Peter Cottontail Silhouette March – DIY Paisley Plate Wall April – 3-D Butterfly Art May – Key to My Heart Statement Necklace June – Mason Jar Memory […]

    Reply
  4. How to Paint Chevron - the Easy Way! says:
    August 11, 2013 at 7:41 pm

    […] of Martha Projects January – Valentine Table February – Peter Cottontail Silhouette March – DIY Paisley Plate Wall April – 3-D Butterfly Art May – Key to My Heart Statement Necklace June – Mason Jar Memory […]

    Reply
  5. Decoupage Lace Pumpkin Tutorial says:
    August 20, 2013 at 7:48 pm

    […] of Martha Projects January – Valentine Table February – Peter Cottontail Silhouette March – DIY Paisley Plate Wall April – 3-D Butterfly Art May – Key to My Heart Statement Necklace June – Mason Jar Memory […]

    Reply
  6. 3D Paper Pumpkin Craft Tutorial says:
    September 16, 2013 at 5:30 am

    […] of Martha Projects January – Valentine Table February – Peter Cottontail Silhouette March – DIY Paisley Plate Wall April – 3-D Butterfly Art May – Key to My Heart Statement Necklace June – Mason Jar Memory […]

    Reply
  7. Make Your Own Memory Jar - perfect for storing knick knacks says:
    September 22, 2013 at 6:47 pm

    […] of Martha Projects January – Valentine Table February – Peter Cottontail Silhouette March – DIY Paisley Plate Wall April – 3-D Butterfly Art May – Key to My Heart Statement Necklace June – Mason Jar Memory […]

    Reply
  8. How to Make Gift Tags at Eclectically Vintage says:
    October 30, 2013 at 10:55 am

    […] – Valentine Table February – Peter Cottontail Silhouette March – DIY Paisley Plate Wall April – 3-D Butterfly Art May – Key to My Heart Statement Necklace June – Mason Jar Memory […]

    Reply
  9. How to Make Gift Bags Out of Brown Paper Bags - Eclectically Vintage says:
    December 10, 2013 at 9:07 am

    […] – Valentine Table February – Peter Cottontail Silhouette March – DIY Paisley Plate Wall April – 3-D Butterfly Art May – Key to My Heart Statement Necklace June – Mason Jar Memory […]

    Reply
  10. Cute Treat Packaging with Martha Stewart Cookie Boxes says:
    December 18, 2013 at 2:34 pm

    […] – Valentine Table February – Peter Cottontail Silhouette March – DIY Paisley Plate Wall April – 3-D Butterfly Art May – Key to My Heart Statement Necklace June – Mason Jar Memory […]

    Reply
  11. 20+ Off the Wall Plate Walls Eclectically Vintage says:
    February 1, 2014 at 7:26 pm

    […] Make sure to check out my favorite way to make an invisible plate hanger? […]

    Reply
  12. Best Plate Hangers for Walls - Buy & DIY says:
    May 12, 2015 at 4:31 am

    […] DIY Invisible Plate Hangers – I shared this simple way to make your own plate […]

    Reply

KELLY

About / Contact / Press
facebook twitter instagram google pinterest snapchat

Join me as I decorate my 100 year old home, scour thrift stores, create pretty things, putter in my peony and hydrangea filled garden, and mix up a mean cocktail all with a touch of sarcasm and a side of bacon - Cheers!


More About Kelly

Love where you live by mixing high and low, new and old to create a home that shows off your personality. My mantra ... simple projects equals more time for cocktails!
Subscribe for Email Updates:

Get in Touch

facebook twitter instagram google pinterest snapchat

I'd love to hear from you:
[email protected]

Privacy Policy

Copyright © 2023 · KellyElko All rights reserved. Site by WordPress Barista

Copyright © 2023 · KellyElko - 2016 on Genesis Framework · WordPress · Log in

This website uses cookies to improve your experience. We'll assume you're ok with this, but you can opt-out if you wish.Accept Reject
Privacy & Cookies Policy

Privacy Overview

This website uses cookies to improve your experience while you navigate through the website. Out of these, the cookies that are categorized as necessary are stored on your browser as they are essential for the working of basic functionalities of the website. We also use third-party cookies that help us analyze and understand how you use this website. These cookies will be stored in your browser only with your consent. You also have the option to opt-out of these cookies. But opting out of some of these cookies may affect your browsing experience.
Necessary
Always Enabled
Necessary cookies are absolutely essential for the website to function properly. This category only includes cookies that ensures basic functionalities and security features of the website. These cookies do not store any personal information.
Non-necessary
Any cookies that may not be particularly necessary for the website to function and is used specifically to collect user personal data via analytics, ads, other embedded contents are termed as non-necessary cookies. It is mandatory to procure user consent prior to running these cookies on your website.
SAVE & ACCEPT
Sign up to get Kelly Elko's latest posts delivered right to your inbox
Your information will never be shared or sold to a 3rd party.
16 shares