• Home
  • Meet Kelly
  • My House
  • Contact

Kelly Elko

Love where you live - inspired decorating ideas

  • Eclectic Homes
  • Projects
    • My Projects
    • FREE Printables
    • Garden
    • Recipes
    • Tips & Tricks
    • Organization
  • Decorate
    • My House
    • Decorating
    • Outdoors
    • Christmas
    • Fall
    • Summer
    • Spring
    • Tablescapes
  • Life
    • Travel
    • Musings
  • Shop

Countdown to Christmas – How to Add Fun Christmas Effects to Photos

October 24, 2014  Christmas | My Projects | Uncategorized

I’m sharing how to add fun effects to photos for a one of a kind look for any season. These pet photo Christmas ideas turned a plain photo of my dog into the cutest little Rudolph puppies that I turned into a garland.
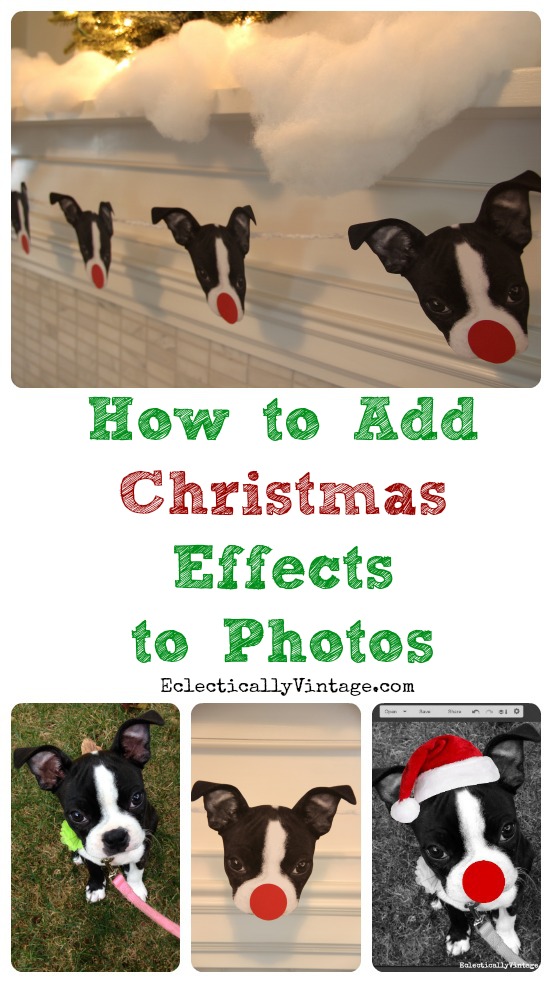
How to Add Effects to Photos - Fun Pet Photo Christmas Ideas! kellyelko.com

Only 9 Fridays til Christmas and five of my friends and I will be bringing you Christmas ideas every Friday through Black Friday to get you in the holiday spirit.

Sushi has been a busy little elf.

Countdown to Christmas - 9 Fridays and lots of creative ideas kellyelko.com

She feels Christmas should revolve around her cuteness and I agree so she put on her diva attitude and strutted her stuff for some pictures which she then demanded be duplicated because one Sushi just isn’t enough.
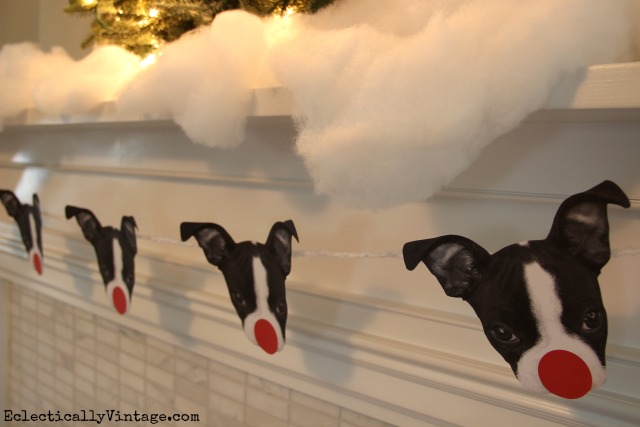
How cute is this dog garland for Christmas- see how to turn your pet's photo into Rudolph! kellyelko.com

Why should Sushi have all the fun? Want to turn your pet into Rudolph?


How to Add Christmas Effects to Photos

Picmonkey Tutorial kellyelko.com

1) Take a cute photo of your pet – focus on the head and face (the background can be cut away later)

2) Download this blank white background

3) Go to Picmonkey.com (free photo editing site) and click Edit then choose the black white background that you just downloaded
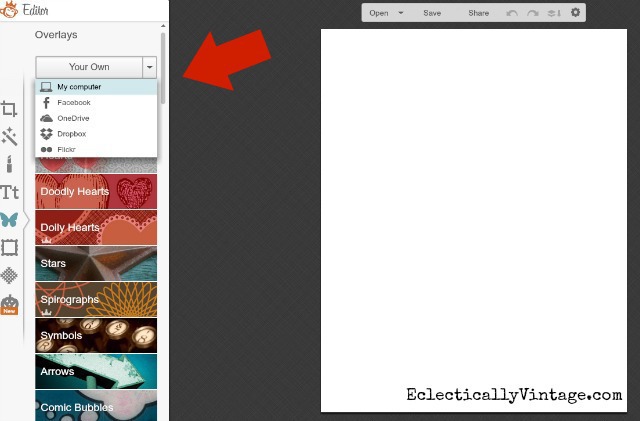
Picmonkey Tutorial using blank 8 1/2 x 11 kellyelko.com

3) Click on Overlays (Butterfly icon) on the left side

4) Click on Your Own at the top of the overlay column

5) Click on My Computer

6) Upload your pet photo
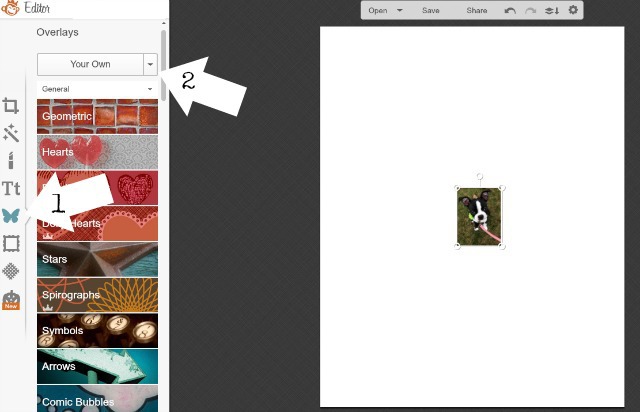
Picmonkey Tutorial - editing a photo kellyelko.com

7) Your photo may be small – enlarge it by grabbing a corner of the photo and dragging it until it fills the white space (smaller if it starts to cut your pets face off)

8) Click on Effects (Magic Wand icon) on left side – scroll down and click Black and White then click Apply

(This will turn your photo black and white which makes the background less noticeable when you cut out your pets head)
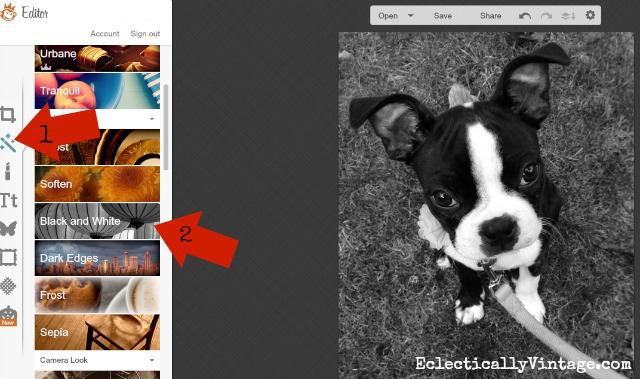
Picmonkey Tutorial - black and white photos kellyelko.com

9) Click on Overlays (Butterfly icon) then click Geometric and choose the circle

10) Change color of circle to red (a box will pop up) and choosing red (do for both colors)
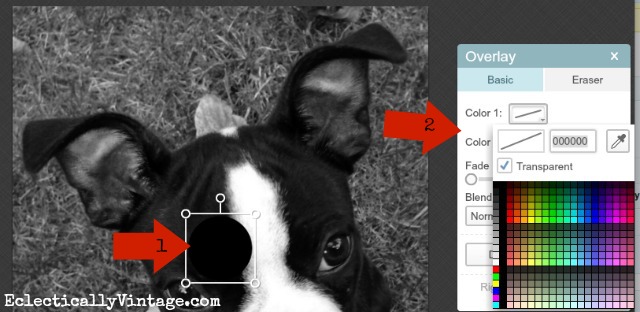
Picmonkey Tutorial - create fun overlays on your pet's photos kellyelko.com

11) Drag red circle over pet’s nose and enlarge or decrease in size as necessary
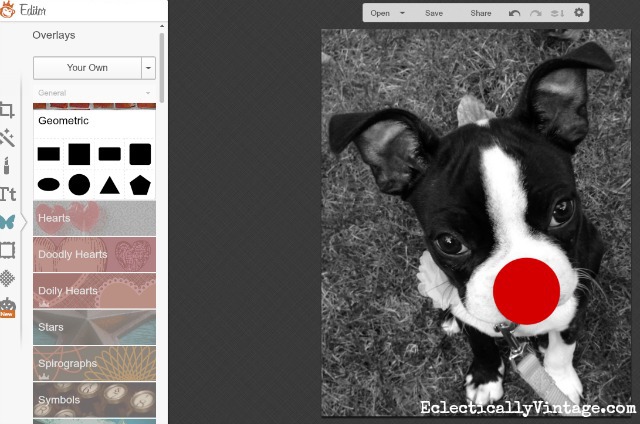
Picmonkey Tutorial - turn your pet's photo into Rudolph the red nosed reindeer! kellyelko.com

12) Save your photo then print on a piece of heavy white card stock

13) Cut your pet’s head out
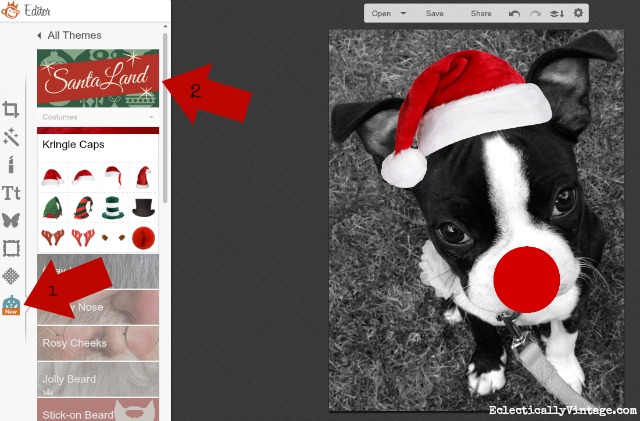
Picmonkey Tutorial - adding Christmas overlay effects to photos kellyelko.com

Don’t stop there …

Add a Santa hat, beard or antlers to your pet by

14) Click Themes (pumpkin icon) then click Santa Land and click on your favorite overlay then drag it where you want and resize as needed.

(yes, I know they have a Rudolph nose in this section – but who knows if it will be around forever – so I showed you a different way in case it disappears).
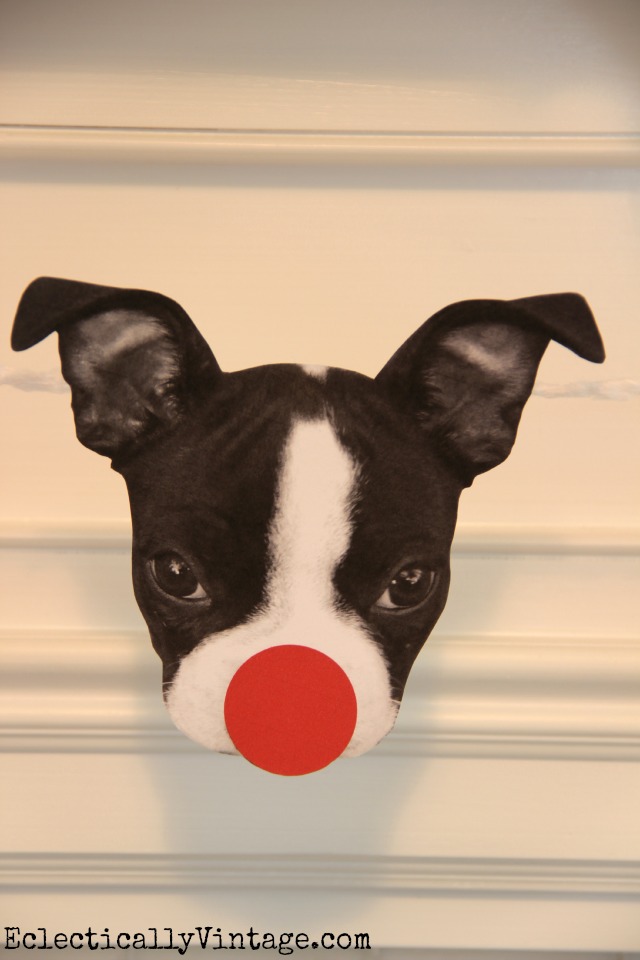
Turn your pet's photo into Rudolph! Easy tutorial shows you how step by step kellyelko.com

Make a garland, ornaments, gift tags or simply frame it!

Whatever you do, your very own little Rudolph is sure to set your heart aglow.


Don’t forget to check out my fully decked out Christmas house from last year for more decorating ideas!

Sign up to get Kelly Elko's latest posts delivered right to your inbox
Your information will never be shared or sold to a 3rd party.

Share this Post!

44 shares
  • Facebook
  • Twitter
  • Email
« Previous: Moscow Mule, Mason Jars & a Giveaway!
Next: Eclectic Home Tour – The Strawberry Patch »

Leave a Comment Cancel reply

Your email address will not be published. Required fields are marked *

Comments

  1. Yvonne @ StoneGable

    October 24, 2014 at 8:30 am

    This is such an adorable idea!!! I love what you did to little Shushi! Thanks for all the great tips on how to make my dog Scamp (another diva) a cute ornament for Christmas! LOVE partying with you girls!!!! Pinning and featuring your project on my facebook page!

    Reply
  2. JIll

    October 24, 2014 at 11:16 am

    O.K This is tooooooo cute!!!

    Reply
  3. [email protected]

    October 24, 2014 at 12:20 pm

    Love, love this Kelly…I am saving this post for future reference!!!!

    Reply
  4. Devona

    October 24, 2014 at 12:37 pm

    This is an adorable idea and so simple! I have 5 furbabies and they will be “decking the halls” for Christmas this year! Thanks for sharing such a fun project 🙂

    Reply
  5. Judy

    October 24, 2014 at 1:14 pm

    This is such a cute idea…and Sushi’s face has an incredible resemblance of a “deer”! Thanks for sharing!

    Reply
  6. Jen Y

    October 24, 2014 at 1:14 pm

    Cute idea but what about Thanksgiving?

    Reply
  7. Jennifer

    October 24, 2014 at 1:31 pm

    Love this idea! Thank you!! Holidays are coming and everyone is doing things with their kiddos. Our four legged kids are all we have so this is great!

    Reply
  8. JaneEllen

    October 24, 2014 at 10:17 pm

    I’ve never used Pic Monkey but have wanted to, maybe this will get me started. I’d love to do this with our dog and cat. Maybe even the chickens, would be so cute to do a banner with their faces. Or cards “from our house to yours” with their faces on them. I’m going to print this out so I don’t forget about it, thanks for including this how-to in your post Kelly Looks like you’re having great time with your fur baby. Can imagine she’s pretty happy to be part of your family now. Happy weekend

    Reply
  9. Nana Diana

    October 24, 2014 at 10:24 pm

    LOL- That is so cute~! You are making me nervous though telling me how close Christmas is!!! lol xo Diana

    Reply
  10. [email protected]

    October 25, 2014 at 9:15 am

    So freakin adorbale

    Reply

Trackbacks

  1. WOODLAND CHRISTMAS DEER PILLOW DIY says:
    October 24, 2014 at 7:26 am

    […] ECLECTICALLY VINTAGE ~ HOW TO ADD FUN CHRISTMAS EFFECTS TO A PHOTO […]

    Reply
  2. Christmas Garland: Paper Holly Leaves - In My Own Style says:
    October 24, 2014 at 7:25 pm

    […] Eclectically Vintage […]

    Reply
  3. Christmas Decorations Using Garland Ties - In My Own Style says:
    October 31, 2014 at 6:54 am

    […] Eclectically Vintage […]

    Reply
  4. Christmas Wreath Decorating Ideas - One Wreath with Three Looks says:
    October 31, 2014 at 9:16 am

    […] you missed my week 10 or week 9 project, be sure to check them […]

    Reply
  5. Easy Art Update - Perfect for any Holiday! says:
    November 7, 2014 at 8:49 pm

    […] you missed my week 10, week 9, or week 8 projects, be sure to check them […]

    Reply
  6. How to Make an Upholstery Webbing Table Runner says:
    November 20, 2014 at 10:29 pm

    […] case you missed it, see what I created over the past few weeks –  Oh Deer, Add Christmas Effects to Photos, Wreath Decorating Ideas, Easy Art […]

    Reply

KELLY

About / Contact / Press
facebook twitter instagram google pinterest snapchat

Join me as I decorate my 100 year old home, scour thrift stores, create pretty things, putter in my peony and hydrangea filled garden, and mix up a mean cocktail all with a touch of sarcasm and a side of bacon - Cheers!


More About Kelly

Love where you live by mixing high and low, new and old to create a home that shows off your personality. My mantra ... simple projects equals more time for cocktails!
Subscribe for Email Updates:

Get in Touch

facebook twitter instagram google pinterest snapchat

I'd love to hear from you:
[email protected]

Privacy Policy

Copyright © 2023 · KellyElko All rights reserved. Site by WordPress Barista

Copyright © 2023 · KellyElko - 2016 on Genesis Framework · WordPress · Log in

This website uses cookies to improve your experience. We'll assume you're ok with this, but you can opt-out if you wish.Accept Reject
Privacy & Cookies Policy

Privacy Overview

This website uses cookies to improve your experience while you navigate through the website. Out of these, the cookies that are categorized as necessary are stored on your browser as they are essential for the working of basic functionalities of the website. We also use third-party cookies that help us analyze and understand how you use this website. These cookies will be stored in your browser only with your consent. You also have the option to opt-out of these cookies. But opting out of some of these cookies may affect your browsing experience.
Necessary
Always Enabled
Necessary cookies are absolutely essential for the website to function properly. This category only includes cookies that ensures basic functionalities and security features of the website. These cookies do not store any personal information.
Non-necessary
Any cookies that may not be particularly necessary for the website to function and is used specifically to collect user personal data via analytics, ads, other embedded contents are termed as non-necessary cookies. It is mandatory to procure user consent prior to running these cookies on your website.
SAVE & ACCEPT
Sign up to get Kelly Elko's latest posts delivered right to your inbox
Your information will never be shared or sold to a 3rd party.
44 shares